Post by Candyman on Jul 1, 2008 10:27:37 GMT -8
Hey Everyone,
I wanted to give you a little better look at one of the most popular DA Buffers on the market today! The Porter Cable 7424 DA Buffer is a light weight, and easy to use Buffer that is very reliable, and can produce great results!
The Porter Cable 7424 dual-action car polisher started the pro-consumer car polisher market life more than a decade ago. The machine started as a sander for woodworkers. Much like custom car builders, fine furniture artisans sculpt a piece of furniture, stain it to a desired color, then spray it with multiple coats of clear polyurethane. To achieve the final finish, they wet sand, compound, polish and wax.
With the introduction of foam polishing pads into the paint and body industry in the 1970's, it’s not hard to see how the Porter Cable 7424 came into use on car finishes. Since the late 1990's, the Porter Cable 7424 polisher has gained recognition as one of the most effective and safest polishers for car enthusiasts and car detailers alike.
Why did the Porter Cable 7424 car polisher become so popular within the car enthusiast hobby? Let’s explore the inner workings of a dual-action car polisher and find out.
Most dual-action polishers use an offset spindle that freely orbits around the center shaft. A counterbalance weight dampens vibrations.
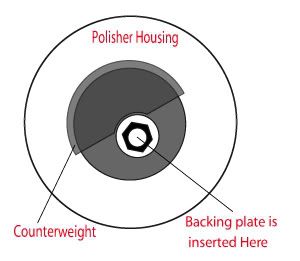
A dual-action car polisher (often called "random orbit" or "orbital") is a machine that operates by orbiting the polishing pad around a center spindle while the pad freely spins on its own axis. A counterweight on the opposite side of the center spindle dampens vibration for smooth operation.
The tool head action, often called orbital, prevents the creation of holograms (symmetrical buffing marks), paint burns and other forms of paint damage often associated with high-speed buffing machines. When used with proper care, the Ultimate Detailing Machine’s design virtually eliminates the possibility of paint damage.
The orbiting head action, combined with a high-speed motor offers the same gentle polishing action as your hand, only at super high speed.
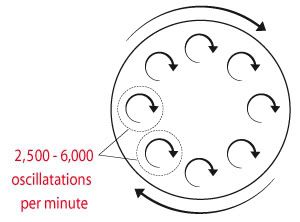
The polishing action of a dual-action polisher closely mimics that of circular hand polishing. Imagine being able to make 2,500 to 6,000 tight hand circles in a single minute and you’ll have a pretty good idea of how the Ultimate Detailing Machine does its job. It works just like your hand, only at super-human speed!
Some people have defined a dual-action polisher's tool action as “jiggling”, but this is not the case. The head freely rotates on a bearing and orbits around the centerline driveshaft. Rotation is a free-wheeling action of the backing plate spindle caused by the orbiting head. This “dual-action” is where the Porter Cable 7424 gets its “DA” nickname.
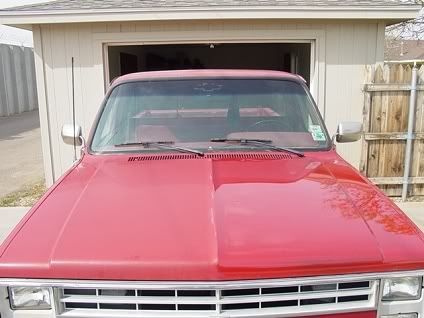
Here's a great example of what a dual-action car polisher can do when used with the proper polish and foam polishing pad.
As you can see, even a badly oxidized finish can be restored to a nice shine.
If you have previously owned a random-orbit car polisher that made a lot of racket, but did little else for your car’s finish, you will appreciate the 7424 as a "professional grade" machine. Most consumer “car polishers” don’t have enough power, have a very small orbit (often less than 1/4 inch), and have limited accessories. The Porter Cable 7424 is the first machine to shatter these limitations.
BASIC FEATURES & OPERATION
The Porter Cable 7424 has a powerful motor for its size (3.7 amps), and the Ultimate Detailing Machine is even more powerful (4.2 amps). If you don’t have a garage, you can run these polishers off of your car battery using a 750+ watt power inverter. Both the Ultimate Detailing Machine and the Porter Cable 7424 uses a standard 5/16-24 spindle, so a lot of different attachments will fit.
In pictures, the Porter Cable 7424 and the Ultimate Detailing Machine look larger than they are. They measure about 10 inches in length and weigh about 6 pounds with a backing plate and pad attached.
A reversible side handle makes both the Ultimate Detailing Machine and the Porter Cable 7424 very easy to hold and control, even when working on vertical surfaces. Use of the side handle is a personal preference. It adds a bit of safety, but people with large hands may find it just as easy to grip the polisher by the head with a single hand.
These machines both function at 2,500 to 6,000 operations per minutes (OPM), controllable by a thumbwheel on the rear end of the machine. The OPM measurement is used instead of revolutions per minute (RPM) to distinguish the difference between orbits and center shaft revolutions. At 6,000 OPM, these car polishers are doing a lot of work.
The standard Porter Cable 7424 car polisher comes equipped with a single white foam polishing pad that is permanently fixed to a 5” baking plate (Porter Cable calls them back-up pads). The standard foam pad is great for general purpose polishing and waxing. Due to the replacement cost of Porter Cable’s foam pad (p/n 54745), most Porter Cable 7424 owners quickly switch to a Velcro backing plate and Velcro backed foam pads.
Comparatively, the Ultimate Detailing Machine comes fully equipped with a Velcro backing plate and a functional foam polishing pad. Ultimate Detailing Machine also offers a fully equipped model with a full compliment of foam polishing pads and microfiber bonnet.
Feature PC UDM
Direct Drive Eccentric "Dual-Action" w/ Counterbalance YES YES
Motor 3.7 AMP, 110 VOLT 4.2 AMP, 110 or 240 VOLT
Velcro Backing Plate NO (option) YES (5", flexible)
Foam Polishing Pad YES YES
Carrying Case NO (option) YES (canvas bag)
Warranty 1 Yr, Parts 1 Yr, Replacement
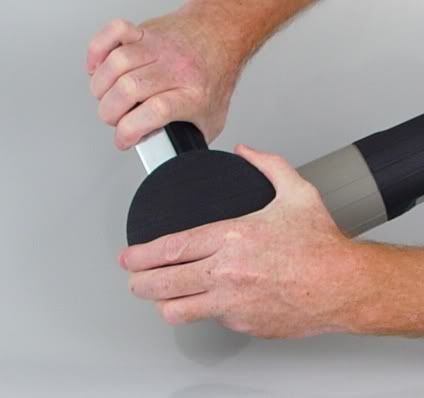
Changing pads and backing plates is easy. You use the flat spindle wrench supplied with the car polisher to hold the spindle and rotate the backing plate counter-clockwise to loosen or clockwise to tighten. When tightening, it is not necessary to turn the backing plate more than ¼ turn once it has initially seated. Do not over-tighten. Snug is just fine.
Changing backing plates is easy. Use the flat wrench provided with your Ultimate Detailing Machine or Porter Cable 7424 to hold the center spindle and unscrew the backing plate with your hand. Do not over-tighten.
For safety reasons, do not operate your dual-action polisher unless the pad is flat on the work surface. That means you both start and stop the machine while it is resting flat on the surface of the car. If you’re not going to follow this safety precaution, please wear safety glasses.
To operate the machine, follow these simple instructions:
1. Your car must be freshly washed and dry. Do not buff on a dirty finish.
2. Work in an area with good lighting. Overhead fluorescent or halogen lighting is best.
3. Remove all rings, watches, bracelets, belts and other items that will scratch your paint.
4. Wear an apron to protect your clothing and the paint finish.
5. Adjust the machine speed to 3 or 4 on the thumbwheel. This is a good starting point.
6. With the machine switched off, apply a small amount of polish, cleaner or wax directly to the polishing pad. There are two good methods that seem to work. Squeeze out a complete ring of product about 1 inch in from the outside of the pad, or squeeze out an “X” of product across the pad.
7. Dab the pad in 3-4 spots around the area to be polished, cleaned or waxed to distribute the product.
8. Position the polisher flat on the work surface, get a firm grip and switch it on with your thumb.
9. Move the polisher back and forth (east/west) in a slow, sweeping motion, overlapping each pass (by 50% of the pad width) with the previous, and then switch your pattern to up and down (north/south).
10. It is not necessary to apply more than a pound of pad pressure. Allow the polisher to work under its own weight.
11. Use a clean pad with each product. Do not mix products on a pad. If a pad is not dirty, you may store it in a Ziploc baggie for future use. Be sure to label the baggie or the pad.
12. If a pad becomes caked with product, use a nylon or horsehair detailing brush to clean the pad.
Sounds pretty simple, doesn’t it? It really isn’t difficult. Within a few minutes of use, most people are very comfortable operating the machine.
BUFFING PADS & BACKING PLATES
It’s possible to use a range of backing plates and pads with the Porter Cable 7424. Velcro backing plates are available in sizes ranging from 3 to 7 inches.
For proper and safe operation, the backing plate and pad combination must be balanced to the installed counterweight. The purpose of the counterweight is to dampen harmonic distortions (vibration) caused by the pad whipping around in its tight orbit. If the counterweight was not in place, you would not be able to hang on to the machine for more than a few minutes before your hand went numb.
DAS pads are larger in diameter and will cover a large area faster. The recessed area on the back protects your car from accidentally damage with the backing plate. The DAS Orange Pad is ideal for removing light oxidation and fine swirl marks. When used with a fine polish, such as Sonus SFX-3 Final Finish or Sonus Paintwork Cleanser, the DAS Green pad helps improve overall gloss. The DAS Blue pad applies liquid waxes and sealants quickly and evenly.
SFX pads are smaller and have greater foam density for intensive polishing applications. When used with SFX-1 Restore Polish, the SFX-1 pad will remove fine scratches, heavy swirl marks and other paint defects. Use the SFX-2 Pad with Sonus SFX-2 Swirl Remover Polish to polish away fine swirl marks, holograms and cobweb effect. Follow with the SFX-3 Pad and Sonus SFX-3 Final Finish for the ultimate gloss finish. The SFX-3 Pad is also the right choice for machine application of all liquid sealants and waxes.
The effective pad contact diameter for the Porter Cable 7424 is 4 to 7 inches. Pads must be matched to an appropriate polish to achieve the desired results. Don’t try to use a fine hand polish with a cutting pad to remove heavy oxidation or swirl marks. It simply won’t work.
I discourage the use of coarse “cutting” pads by inexperienced users due to the real potential of removing too much paint material or creating severe hazing in the paint.
MAINTAINING & IMPROVING PAINT GLOSS
It is polishing, not waxing, that offers the most improvement in the overall appearance of paint. If you wax over bad paint, it’s still bad paint. When you polish bad paint (paint with scratches, heavy oxidation, swirl marks, stains, water spots, etc.), you remove the bad paint to reveal a fresh finish. Obviously you can only do so much polishing before you wear out (thin or completely remove) the paint, so only polish as much as necessary to maintain healthy paint.
Buffing pad and polish makers create products with different levels of aggressiveness to make your polishing tasks faster and easier. You can use an aggressive pad and polish combination to quickly remove paint defects or severe oxidation, but it won’t reveal the full gloss potential of your paint finish. Just like polishing a jewel, you must use several grades of polish to bring out the final radiance.
If your paint is new or like new, it is not necessary to use heavy abrasives. You can use very mild pre-wax cleaners and glazes to maintain the factory finish or create a finish that glows like a gem. To do so, use a fine polish and a foam polishing pad, and work the polish in with a light touch until most of the polish residue is gone. Remove the remaining polish residue with a quality buffing towel. Fine polishes won’t take a lot of heat before they cake up and clog your pad, so don’t apply pressure to the machine. Allow the pad and polish to do the work.
Some polishes respond well to a microfiber buffing bonnet, while others do not. If you’re using a polish that is not buffing out clear, try doing the final buff out with a microfiber bonnet over a clean pad.
Here's how I use my dual-action polishers to keep my paint looking new:
Select a the most appropriate foam polish pad for the job. Here I'm using a light duty foam Polishing Pad, which is perfect for light polishing an cleaning.
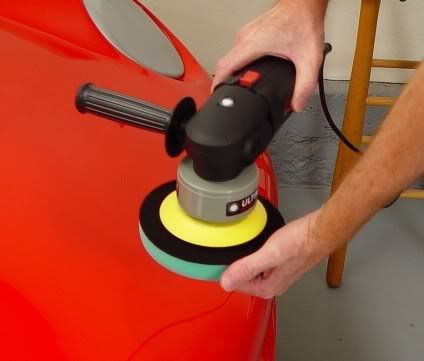
Step 2: Apply Polish To Pad
Select a good pre-wax cleaner. I'm using Ultima Paint Prep Plus for the purpose of this demonstration. This is a combination polish, paint cleaner and swirl remover in one. This product goes on amazingly smooth and leaves an amazing shine.
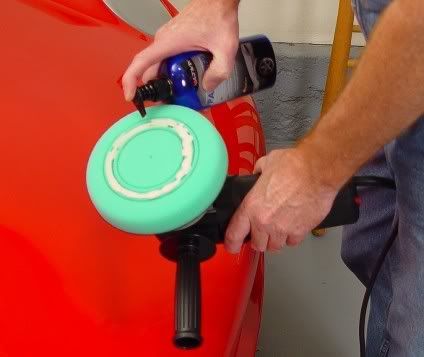
Step 3: Distribute Polish On Work Area
Distribute the polish over the work area. If you don't, the polish will sling off of the pad. You can dab it, as I have done here, or smear it.
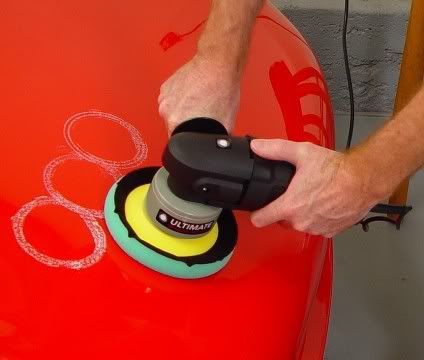
Step 4: Start Polish At Low Speed
Start the polisher at a low speed (2 or so on the dial). Get the polish loaded into the pad before increasing speed.
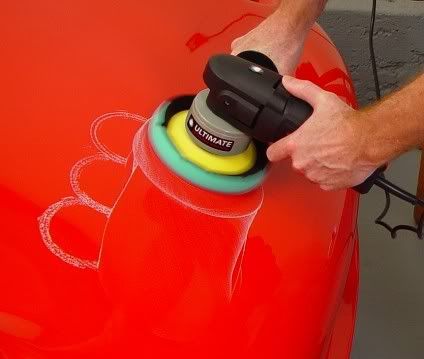
Step 5: Increase Speed and Work-in Polish
Work the polish into the paint. Keep the polisher flat, and apply just enough pressure to keep the pad in full contact. Use slow, smooth back-and-forth and up-and-down sweeping motions.
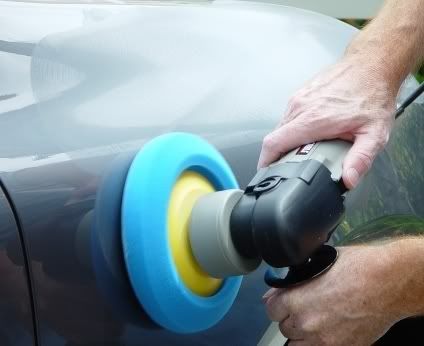
Step 6: Polish Until Film Is Nearly Gone
As you work the polish, the film will get lighter until only a slight haze remains. At this point you can stop and inspect your work. You can remove the remaining polish haze with a buffing towel or switch to a finishing pad.
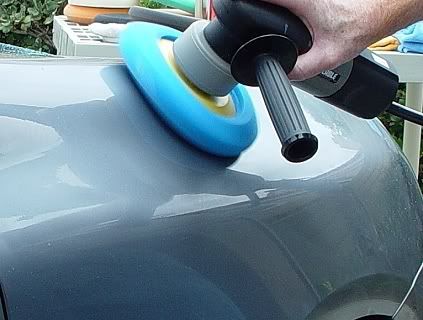
Step7: Switch To A Finishing Pad or Bonnet
You can use a finishing pad or a bonnet to remove the final polish residue. Some people prefer doing this step by hand.
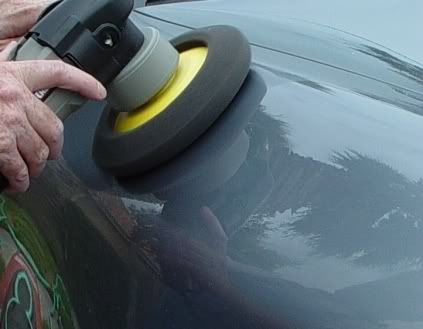
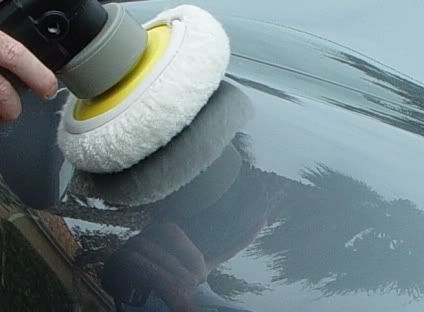
Step 8: Remove Dust With A Detailing Spray & Buffing Towel
The polishing pads will leave dry dust on the surface. Use a detailing spray and a soft buffing towel to wipe away the polish dust before waxing.
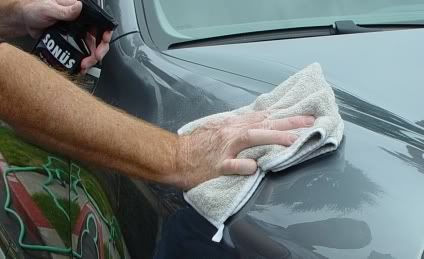
Step 9: Switch To A Finishing Pad For Waxing
After polishing, use a finishing pad to apply your favorite wax. Liquid waxes are easy, but you can also pop most waxes out of their can, as I do here with a can of P21S Carnauba Wax. Work the wax in well (use a low speed), then use a clean buffing bonnet to buff out the final finish.
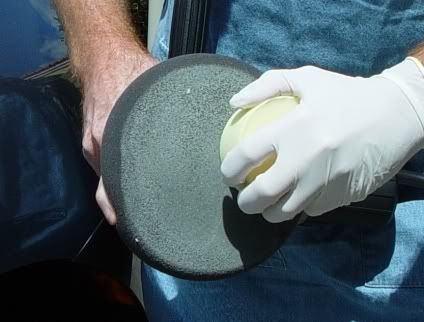
Step 10: Cleanup Cracks & Crevices
After waxing, use horsehair detailing brushes to remove polish and wax residue from all cracks and crevices.
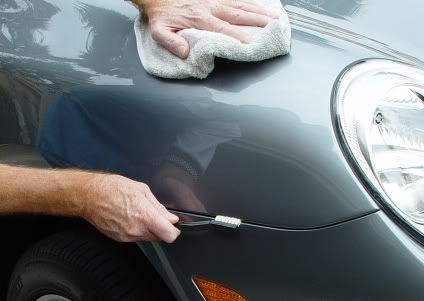
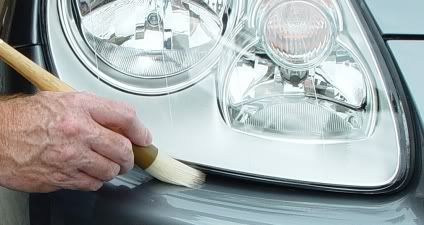
Step 11: Inspect Final Finish
After polishing and waxing, your final paint finish should be smooth, glossy and wet looking.
PAD & POLISHER MAINTENANCE
The Ultimate Detailing Machine and Porter Cable 7424 polishers are low maintenance tools. Both manufacturers recommend yearly lubrication by a qualified repair center. If you use the machine professionally, I would follow the manufacturer’s recommendation. For the typical enthusiast, sending the machine in for lubrication every two or three years should be sufficient. If you feel comfortable doing the job yourself, all you need is red lithium grease and a screwdriver.
There are varying opinions on pad cleaning techniques. Not long ago, the pad manufacturers themselves would tell you not to wash the pads, as the water and detergent would de-laminate the Velcro from the foam. For the most part, this seems to be resolved.
If you are a professional detailer, washing pads after each use would be very time consuming. The best solution for the professional is to keep pads brushed clean and store them in large Zip-lock baggies. Mark the back of each pad with a marker to indicate which product is on the pad. When the pad becomes too dirty to use, wash it.
Use a detailer's brush to brush dry and caked-on polish off of your pads. You can use a nylon or a horsehair brush. Do not use a wire brush.
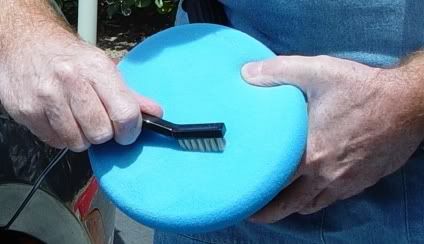
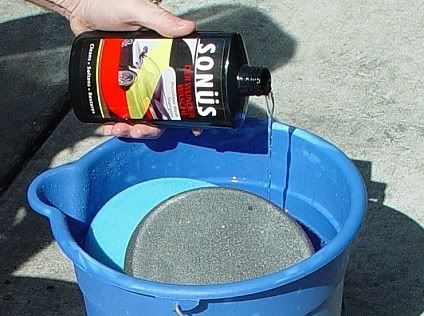
Do not wash pads in the washing machine. They must be hand washed. To do so, simply add an ounce of dish washing detergent to a 5 gallon bucket and fill it with water. Soak the dirty pad for up to 30 minutes. After soaking, massage the pads to work out the caked in polish, then squeeze out the soapy water. Empty and refill the bucket with fresh water. Rinse the pads in the bucket of fresh water, squeeze, and set aside to air dry. Do not machine dry.
Soak your pads in a bucket of water and add a pad cleaning solution. Sonus Der Wunder Wasche is designed specifically for cleaning microfiber towels and foam buffing pads. It's a low foaming detergent that's easy to rinse. Allow pads to soak for up to an hour.
PRACTICE MAKES PERFECT
While the Ultimate Detailing Machine and Porter Cable 7424 are easy car polishers to master, practicing on an older car with an imperfect finish is the best way to learn. You should experiment with a variety of polish and pad combinations until you learn how to achieve the best results.
There is no silver bullet combination of pads and polish. How you use the machine, your climate, paint hardness, paint color and other issues will all factor into the final results. Don’t get frustrated if your initial experience is not perfect, as the smallest change (a different pad, polish or speed) can make a huge difference.
SUMMARY
A dual-action car polisher makes polishing easy and allows anyone to create a stunning finish or restore a badly worn finish. All it takes is a little practice and the right selection of pads and polishes.
I wanted to give you a little better look at one of the most popular DA Buffers on the market today! The Porter Cable 7424 DA Buffer is a light weight, and easy to use Buffer that is very reliable, and can produce great results!
The Porter Cable 7424 dual-action car polisher started the pro-consumer car polisher market life more than a decade ago. The machine started as a sander for woodworkers. Much like custom car builders, fine furniture artisans sculpt a piece of furniture, stain it to a desired color, then spray it with multiple coats of clear polyurethane. To achieve the final finish, they wet sand, compound, polish and wax.
With the introduction of foam polishing pads into the paint and body industry in the 1970's, it’s not hard to see how the Porter Cable 7424 came into use on car finishes. Since the late 1990's, the Porter Cable 7424 polisher has gained recognition as one of the most effective and safest polishers for car enthusiasts and car detailers alike.
Why did the Porter Cable 7424 car polisher become so popular within the car enthusiast hobby? Let’s explore the inner workings of a dual-action car polisher and find out.
Most dual-action polishers use an offset spindle that freely orbits around the center shaft. A counterbalance weight dampens vibrations.

A dual-action car polisher (often called "random orbit" or "orbital") is a machine that operates by orbiting the polishing pad around a center spindle while the pad freely spins on its own axis. A counterweight on the opposite side of the center spindle dampens vibration for smooth operation.
The tool head action, often called orbital, prevents the creation of holograms (symmetrical buffing marks), paint burns and other forms of paint damage often associated with high-speed buffing machines. When used with proper care, the Ultimate Detailing Machine’s design virtually eliminates the possibility of paint damage.
The orbiting head action, combined with a high-speed motor offers the same gentle polishing action as your hand, only at super high speed.

The polishing action of a dual-action polisher closely mimics that of circular hand polishing. Imagine being able to make 2,500 to 6,000 tight hand circles in a single minute and you’ll have a pretty good idea of how the Ultimate Detailing Machine does its job. It works just like your hand, only at super-human speed!
Some people have defined a dual-action polisher's tool action as “jiggling”, but this is not the case. The head freely rotates on a bearing and orbits around the centerline driveshaft. Rotation is a free-wheeling action of the backing plate spindle caused by the orbiting head. This “dual-action” is where the Porter Cable 7424 gets its “DA” nickname.
Here's a great example of what a dual-action car polisher can do when used with the proper polish and foam polishing pad.
As you can see, even a badly oxidized finish can be restored to a nice shine.

If you have previously owned a random-orbit car polisher that made a lot of racket, but did little else for your car’s finish, you will appreciate the 7424 as a "professional grade" machine. Most consumer “car polishers” don’t have enough power, have a very small orbit (often less than 1/4 inch), and have limited accessories. The Porter Cable 7424 is the first machine to shatter these limitations.
BASIC FEATURES & OPERATION
The Porter Cable 7424 has a powerful motor for its size (3.7 amps), and the Ultimate Detailing Machine is even more powerful (4.2 amps). If you don’t have a garage, you can run these polishers off of your car battery using a 750+ watt power inverter. Both the Ultimate Detailing Machine and the Porter Cable 7424 uses a standard 5/16-24 spindle, so a lot of different attachments will fit.
In pictures, the Porter Cable 7424 and the Ultimate Detailing Machine look larger than they are. They measure about 10 inches in length and weigh about 6 pounds with a backing plate and pad attached.
A reversible side handle makes both the Ultimate Detailing Machine and the Porter Cable 7424 very easy to hold and control, even when working on vertical surfaces. Use of the side handle is a personal preference. It adds a bit of safety, but people with large hands may find it just as easy to grip the polisher by the head with a single hand.
These machines both function at 2,500 to 6,000 operations per minutes (OPM), controllable by a thumbwheel on the rear end of the machine. The OPM measurement is used instead of revolutions per minute (RPM) to distinguish the difference between orbits and center shaft revolutions. At 6,000 OPM, these car polishers are doing a lot of work.
The standard Porter Cable 7424 car polisher comes equipped with a single white foam polishing pad that is permanently fixed to a 5” baking plate (Porter Cable calls them back-up pads). The standard foam pad is great for general purpose polishing and waxing. Due to the replacement cost of Porter Cable’s foam pad (p/n 54745), most Porter Cable 7424 owners quickly switch to a Velcro backing plate and Velcro backed foam pads.
Comparatively, the Ultimate Detailing Machine comes fully equipped with a Velcro backing plate and a functional foam polishing pad. Ultimate Detailing Machine also offers a fully equipped model with a full compliment of foam polishing pads and microfiber bonnet.
Feature PC UDM
Direct Drive Eccentric "Dual-Action" w/ Counterbalance YES YES
Motor 3.7 AMP, 110 VOLT 4.2 AMP, 110 or 240 VOLT
Velcro Backing Plate NO (option) YES (5", flexible)
Foam Polishing Pad YES YES
Carrying Case NO (option) YES (canvas bag)
Warranty 1 Yr, Parts 1 Yr, Replacement
Changing pads and backing plates is easy. You use the flat spindle wrench supplied with the car polisher to hold the spindle and rotate the backing plate counter-clockwise to loosen or clockwise to tighten. When tightening, it is not necessary to turn the backing plate more than ¼ turn once it has initially seated. Do not over-tighten. Snug is just fine.
Changing backing plates is easy. Use the flat wrench provided with your Ultimate Detailing Machine or Porter Cable 7424 to hold the center spindle and unscrew the backing plate with your hand. Do not over-tighten.

For safety reasons, do not operate your dual-action polisher unless the pad is flat on the work surface. That means you both start and stop the machine while it is resting flat on the surface of the car. If you’re not going to follow this safety precaution, please wear safety glasses.
To operate the machine, follow these simple instructions:
1. Your car must be freshly washed and dry. Do not buff on a dirty finish.
2. Work in an area with good lighting. Overhead fluorescent or halogen lighting is best.
3. Remove all rings, watches, bracelets, belts and other items that will scratch your paint.
4. Wear an apron to protect your clothing and the paint finish.
5. Adjust the machine speed to 3 or 4 on the thumbwheel. This is a good starting point.
6. With the machine switched off, apply a small amount of polish, cleaner or wax directly to the polishing pad. There are two good methods that seem to work. Squeeze out a complete ring of product about 1 inch in from the outside of the pad, or squeeze out an “X” of product across the pad.
7. Dab the pad in 3-4 spots around the area to be polished, cleaned or waxed to distribute the product.
8. Position the polisher flat on the work surface, get a firm grip and switch it on with your thumb.
9. Move the polisher back and forth (east/west) in a slow, sweeping motion, overlapping each pass (by 50% of the pad width) with the previous, and then switch your pattern to up and down (north/south).
10. It is not necessary to apply more than a pound of pad pressure. Allow the polisher to work under its own weight.
11. Use a clean pad with each product. Do not mix products on a pad. If a pad is not dirty, you may store it in a Ziploc baggie for future use. Be sure to label the baggie or the pad.
12. If a pad becomes caked with product, use a nylon or horsehair detailing brush to clean the pad.
Sounds pretty simple, doesn’t it? It really isn’t difficult. Within a few minutes of use, most people are very comfortable operating the machine.
BUFFING PADS & BACKING PLATES
It’s possible to use a range of backing plates and pads with the Porter Cable 7424. Velcro backing plates are available in sizes ranging from 3 to 7 inches.
For proper and safe operation, the backing plate and pad combination must be balanced to the installed counterweight. The purpose of the counterweight is to dampen harmonic distortions (vibration) caused by the pad whipping around in its tight orbit. If the counterweight was not in place, you would not be able to hang on to the machine for more than a few minutes before your hand went numb.
DAS pads are larger in diameter and will cover a large area faster. The recessed area on the back protects your car from accidentally damage with the backing plate. The DAS Orange Pad is ideal for removing light oxidation and fine swirl marks. When used with a fine polish, such as Sonus SFX-3 Final Finish or Sonus Paintwork Cleanser, the DAS Green pad helps improve overall gloss. The DAS Blue pad applies liquid waxes and sealants quickly and evenly.
SFX pads are smaller and have greater foam density for intensive polishing applications. When used with SFX-1 Restore Polish, the SFX-1 pad will remove fine scratches, heavy swirl marks and other paint defects. Use the SFX-2 Pad with Sonus SFX-2 Swirl Remover Polish to polish away fine swirl marks, holograms and cobweb effect. Follow with the SFX-3 Pad and Sonus SFX-3 Final Finish for the ultimate gloss finish. The SFX-3 Pad is also the right choice for machine application of all liquid sealants and waxes.
The effective pad contact diameter for the Porter Cable 7424 is 4 to 7 inches. Pads must be matched to an appropriate polish to achieve the desired results. Don’t try to use a fine hand polish with a cutting pad to remove heavy oxidation or swirl marks. It simply won’t work.
I discourage the use of coarse “cutting” pads by inexperienced users due to the real potential of removing too much paint material or creating severe hazing in the paint.
MAINTAINING & IMPROVING PAINT GLOSS
It is polishing, not waxing, that offers the most improvement in the overall appearance of paint. If you wax over bad paint, it’s still bad paint. When you polish bad paint (paint with scratches, heavy oxidation, swirl marks, stains, water spots, etc.), you remove the bad paint to reveal a fresh finish. Obviously you can only do so much polishing before you wear out (thin or completely remove) the paint, so only polish as much as necessary to maintain healthy paint.
Buffing pad and polish makers create products with different levels of aggressiveness to make your polishing tasks faster and easier. You can use an aggressive pad and polish combination to quickly remove paint defects or severe oxidation, but it won’t reveal the full gloss potential of your paint finish. Just like polishing a jewel, you must use several grades of polish to bring out the final radiance.
If your paint is new or like new, it is not necessary to use heavy abrasives. You can use very mild pre-wax cleaners and glazes to maintain the factory finish or create a finish that glows like a gem. To do so, use a fine polish and a foam polishing pad, and work the polish in with a light touch until most of the polish residue is gone. Remove the remaining polish residue with a quality buffing towel. Fine polishes won’t take a lot of heat before they cake up and clog your pad, so don’t apply pressure to the machine. Allow the pad and polish to do the work.
Some polishes respond well to a microfiber buffing bonnet, while others do not. If you’re using a polish that is not buffing out clear, try doing the final buff out with a microfiber bonnet over a clean pad.
Here's how I use my dual-action polishers to keep my paint looking new:
Select a the most appropriate foam polish pad for the job. Here I'm using a light duty foam Polishing Pad, which is perfect for light polishing an cleaning.

Step 2: Apply Polish To Pad
Select a good pre-wax cleaner. I'm using Ultima Paint Prep Plus for the purpose of this demonstration. This is a combination polish, paint cleaner and swirl remover in one. This product goes on amazingly smooth and leaves an amazing shine.

Step 3: Distribute Polish On Work Area
Distribute the polish over the work area. If you don't, the polish will sling off of the pad. You can dab it, as I have done here, or smear it.

Step 4: Start Polish At Low Speed
Start the polisher at a low speed (2 or so on the dial). Get the polish loaded into the pad before increasing speed.

Step 5: Increase Speed and Work-in Polish
Work the polish into the paint. Keep the polisher flat, and apply just enough pressure to keep the pad in full contact. Use slow, smooth back-and-forth and up-and-down sweeping motions.

Step 6: Polish Until Film Is Nearly Gone
As you work the polish, the film will get lighter until only a slight haze remains. At this point you can stop and inspect your work. You can remove the remaining polish haze with a buffing towel or switch to a finishing pad.

Step7: Switch To A Finishing Pad or Bonnet
You can use a finishing pad or a bonnet to remove the final polish residue. Some people prefer doing this step by hand.


Step 8: Remove Dust With A Detailing Spray & Buffing Towel
The polishing pads will leave dry dust on the surface. Use a detailing spray and a soft buffing towel to wipe away the polish dust before waxing.

Step 9: Switch To A Finishing Pad For Waxing
After polishing, use a finishing pad to apply your favorite wax. Liquid waxes are easy, but you can also pop most waxes out of their can, as I do here with a can of P21S Carnauba Wax. Work the wax in well (use a low speed), then use a clean buffing bonnet to buff out the final finish.

Step 10: Cleanup Cracks & Crevices
After waxing, use horsehair detailing brushes to remove polish and wax residue from all cracks and crevices.


Step 11: Inspect Final Finish
After polishing and waxing, your final paint finish should be smooth, glossy and wet looking.
PAD & POLISHER MAINTENANCE
The Ultimate Detailing Machine and Porter Cable 7424 polishers are low maintenance tools. Both manufacturers recommend yearly lubrication by a qualified repair center. If you use the machine professionally, I would follow the manufacturer’s recommendation. For the typical enthusiast, sending the machine in for lubrication every two or three years should be sufficient. If you feel comfortable doing the job yourself, all you need is red lithium grease and a screwdriver.
There are varying opinions on pad cleaning techniques. Not long ago, the pad manufacturers themselves would tell you not to wash the pads, as the water and detergent would de-laminate the Velcro from the foam. For the most part, this seems to be resolved.
If you are a professional detailer, washing pads after each use would be very time consuming. The best solution for the professional is to keep pads brushed clean and store them in large Zip-lock baggies. Mark the back of each pad with a marker to indicate which product is on the pad. When the pad becomes too dirty to use, wash it.
Use a detailer's brush to brush dry and caked-on polish off of your pads. You can use a nylon or a horsehair brush. Do not use a wire brush.

Do not wash pads in the washing machine. They must be hand washed. To do so, simply add an ounce of dish washing detergent to a 5 gallon bucket and fill it with water. Soak the dirty pad for up to 30 minutes. After soaking, massage the pads to work out the caked in polish, then squeeze out the soapy water. Empty and refill the bucket with fresh water. Rinse the pads in the bucket of fresh water, squeeze, and set aside to air dry. Do not machine dry.
Soak your pads in a bucket of water and add a pad cleaning solution. Sonus Der Wunder Wasche is designed specifically for cleaning microfiber towels and foam buffing pads. It's a low foaming detergent that's easy to rinse. Allow pads to soak for up to an hour.

PRACTICE MAKES PERFECT
While the Ultimate Detailing Machine and Porter Cable 7424 are easy car polishers to master, practicing on an older car with an imperfect finish is the best way to learn. You should experiment with a variety of polish and pad combinations until you learn how to achieve the best results.
There is no silver bullet combination of pads and polish. How you use the machine, your climate, paint hardness, paint color and other issues will all factor into the final results. Don’t get frustrated if your initial experience is not perfect, as the smallest change (a different pad, polish or speed) can make a huge difference.
SUMMARY
A dual-action car polisher makes polishing easy and allows anyone to create a stunning finish or restore a badly worn finish. All it takes is a little practice and the right selection of pads and polishes.

