Post by Candyman on Mar 2, 2010 1:45:04 GMT -8
Hey Everyone,
Ever wonder how Custom Painters are able to paint simulated Carbon Fiber, or a Brushed Aluminum Effect? How about realistic looking Wood Grain, or 3D Water Droplets that look like they are embedded into the Paint?
When it comes to Custom Paint Work, their are a lot of really simple effects that are done using really surprisingly easy techniques to get very cool, and unique results. Here are just a few secrets to doing Custom Paint that anyone can do at home! All it takes is a little practice, and you can pull off some professional results!
I will start posting some write ups on how to do some of the hottest Custom Paint Effects, and how they are done, and will follow up with How TO Video's from some of the best known Air Brush Artists around so you can see how these effects are actually done. I hope you enjoy these Write Ups, and maybe even become inspired to pick up an Air Brush and give it a try! Its not hard to do, a lot of fun, and you never know, you just might find a hidden artist in you that you never knew existed!
1. SIMULATED CARBON FIBER EFFECT:
Simulated Carbon Fiber is actually a really hot ticket item right now in the Custom Paint community! Their are a lot of Aftermarket Carbon Fiber Parts available which both reduce weight, and kind of have a cool different look to them with their weave pattern look. The more popular these Parts get, the more people are wanting to paint other parts to match. With that said, you would think Carbon Fiber would be insanely hard, and tedious to pull off that kind of a custom look in paint, but its really not that hard at all!
To pull off this look you will need, preferably an Air Brush, but you can also use a regular Spray Gun and achieve a decent result. Also, for practice purposes, you can also use spray paint to get a feel for this effect.
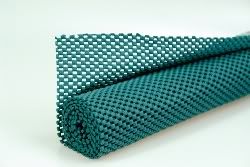
Next you will need a couple of friends, a black painted surface which will be used as your base background for practicing on before you go ahead and do parts on your PT. Then some bright silver paint, and some darker more charcoal paint, and as big of a roll of that rubber liner you line kitchen cabinets, and drawers with. Here is a photo for ya. I believe it should be somewhere in the neighborhood of $2.50 a roll.

With a clean black painted surface that is prepped for paint, you are going to want to have one friend stand at each end of your panel, and hold your Rubber Shelf Liner tightly stretched over your panel which will give you that tightly woven Simulate Carbon Fiber Effect you are going for.
With the Liner pulled tightly as possible, start spraying an even flow of your bright silver paint across your patten panel. Make sure you do as light of coats as you can to best pick up the effect.
Once the Paint has had enough time to Flash, you want to match up your Rubber Liner with the pattern you have just sprayed out. Then take your gun, or Air Brush and mist a coat of darker (I prefer Metallic but its not necessary). Once the Graphite has been sprayed out, take the rubber mat off the panel, and you should have the basic effect.
Once everything dries for the specified time given by the Paint Manufacturer, then lay down at least 4-5 Coats of Clear Urethane, and you should have a really cool looking Panel!
As with most anything involving Custom Paint, it just takes a little practice to get it down. Their is no right, or wrong, and its always fun to experiment, change up colors, and try new stuff. Make sure you practice first on a test panel, or hit up a wrecking yard and ask if you might be able to get them to donate an old hood, or door, or something to practice on before you try it on your car.
Now, I know that words often mean one thing, while actually seeing it being done in person is a whole mother thing all together, so, here is a Youtube Video Tutorial outlining basically exactly the same steps I just talked about in the Write Up which was done by Renowned Air Brush Artist Ed Hubbs
Anyways, please go easy, and I will catch ya all later.
Candyman
.
Ever wonder how Custom Painters are able to paint simulated Carbon Fiber, or a Brushed Aluminum Effect? How about realistic looking Wood Grain, or 3D Water Droplets that look like they are embedded into the Paint?
When it comes to Custom Paint Work, their are a lot of really simple effects that are done using really surprisingly easy techniques to get very cool, and unique results. Here are just a few secrets to doing Custom Paint that anyone can do at home! All it takes is a little practice, and you can pull off some professional results!
I will start posting some write ups on how to do some of the hottest Custom Paint Effects, and how they are done, and will follow up with How TO Video's from some of the best known Air Brush Artists around so you can see how these effects are actually done. I hope you enjoy these Write Ups, and maybe even become inspired to pick up an Air Brush and give it a try! Its not hard to do, a lot of fun, and you never know, you just might find a hidden artist in you that you never knew existed!
1. SIMULATED CARBON FIBER EFFECT:
Simulated Carbon Fiber is actually a really hot ticket item right now in the Custom Paint community! Their are a lot of Aftermarket Carbon Fiber Parts available which both reduce weight, and kind of have a cool different look to them with their weave pattern look. The more popular these Parts get, the more people are wanting to paint other parts to match. With that said, you would think Carbon Fiber would be insanely hard, and tedious to pull off that kind of a custom look in paint, but its really not that hard at all!
To pull off this look you will need, preferably an Air Brush, but you can also use a regular Spray Gun and achieve a decent result. Also, for practice purposes, you can also use spray paint to get a feel for this effect.
Next you will need a couple of friends, a black painted surface which will be used as your base background for practicing on before you go ahead and do parts on your PT. Then some bright silver paint, and some darker more charcoal paint, and as big of a roll of that rubber liner you line kitchen cabinets, and drawers with. Here is a photo for ya. I believe it should be somewhere in the neighborhood of $2.50 a roll.

With a clean black painted surface that is prepped for paint, you are going to want to have one friend stand at each end of your panel, and hold your Rubber Shelf Liner tightly stretched over your panel which will give you that tightly woven Simulate Carbon Fiber Effect you are going for.
With the Liner pulled tightly as possible, start spraying an even flow of your bright silver paint across your patten panel. Make sure you do as light of coats as you can to best pick up the effect.
Once the Paint has had enough time to Flash, you want to match up your Rubber Liner with the pattern you have just sprayed out. Then take your gun, or Air Brush and mist a coat of darker (I prefer Metallic but its not necessary). Once the Graphite has been sprayed out, take the rubber mat off the panel, and you should have the basic effect.
Once everything dries for the specified time given by the Paint Manufacturer, then lay down at least 4-5 Coats of Clear Urethane, and you should have a really cool looking Panel!
As with most anything involving Custom Paint, it just takes a little practice to get it down. Their is no right, or wrong, and its always fun to experiment, change up colors, and try new stuff. Make sure you practice first on a test panel, or hit up a wrecking yard and ask if you might be able to get them to donate an old hood, or door, or something to practice on before you try it on your car.
Now, I know that words often mean one thing, while actually seeing it being done in person is a whole mother thing all together, so, here is a Youtube Video Tutorial outlining basically exactly the same steps I just talked about in the Write Up which was done by Renowned Air Brush Artist Ed Hubbs
Anyways, please go easy, and I will catch ya all later.
Candyman
.

