Post by Candyman on Mar 15, 2010 20:03:05 GMT -8
What it is:
A new PCM and injectors to uprgrade performance and power. The bigger injectors are already installed in the 2004 and 2005 engines so they are not included in the kit.
What it does:
The Stage 1 PCM improves power and performance by modifying the operating parameters of the following items:
Calibration Features - Manual Transmission (MTX)
* Increased WOT and part throttle boost
* Enhanced 1st gear boost schedule for a higher performance launch
* Optimized calibration for the Mopar Performance Blow Off Valve Conversion Kit (P4510548 - sold separately)
* Improved turbo resopnse
* Boost hold feature during Wide Open Throttle shifts
* Soft rev limiter
Calibration Features - Automatic Transmission (ATX)
* Increased WOT and part throttle boost
* Optimized calibration for the Mopar Performance Blow Off Valve Conversion Kit (P4510548 - sold separately)
* Improved turbo resopnse
* Performance optimized transmission calibration
What it costs:
$350.00 plus installation
Where to get it:
The Stage 1 PCM kit can be purchase from Tommy Thrift at:
www.haynesspeedshop.com/Store/product.php?productid=4&cat=0&bestseller
Installation:
Installing a Mopar Stage 1 kit on a 2003 is made more complicated by the required injector replacement step which is NOT required for the 2004 and 2005 model year. If you have a 2004 or 2005 PT GT, skip down to the PCM swap section. The 2005 Stage 1 does specify new plugs and wires.
Injector Swap
The first thing you need to do is depressurize the fuel system to avoid spraying fuel everywhere when you disconnect the fuel rail supply hose. As ominous as it sounds it is actually quite easy:
Fuel system depressurization:
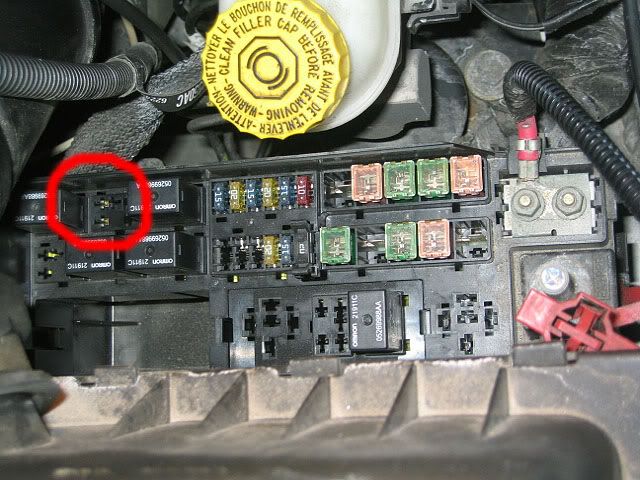
1) Locate the Power Distribution Center that is located between the airbox and firewall.
2) Remove the cover, turn it upside down, use the diagram to locate and remove the fuel pump relay.
3) Start the car and wait until it stalls.
4) Try to restart the engine until it will no longer start.
Your engine check light may come on because you pulled the relay. It should go out after several drives. Mine never came on, so it wasn't an issue. Not so bad was it? The last step before continuing is to disconnect the negative battery cable.
Upper intake manifold removal:
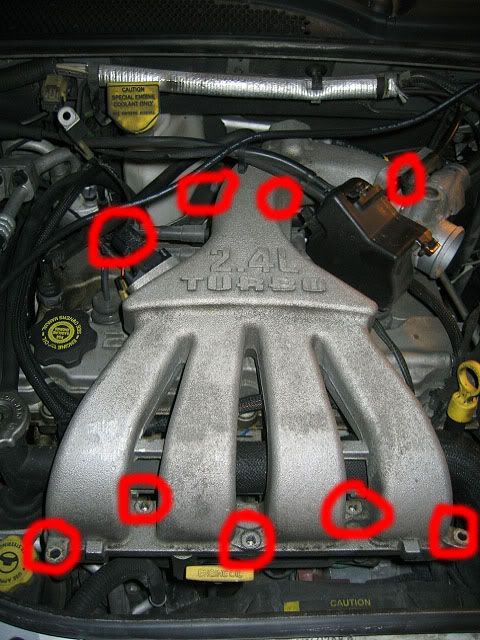
1) Unlock and remove the MAP sensor connector from the middle left side of the manifold.
2) Remove the vacuum hose from the left rear of the intake manifold.
3) Remove the brake boost hose from the middle rear of the intake manifold.
4) Remove the 5 bolts securing the intake to the lower half. Work slowly and be carefull when removing the bolts. Once they fall in the engine compartment they enter a wormhole and disappear forever.
5) Remove the 2 rear manifold support bolts. There will be a sensor on the left side so be careful not to forget to put it back on Re-assembly.
6) Loosen the hose clamps on the throttle body intake hose and airbox.
7) Disconnect the hose from the top of the airbox and remove the top half of the air hose.
8 ) Disconnect the hose from the throttle body and push it to the side. I actually inserted it into the airbox hose to keep it out of the way.
9) Remove the 3 bolts securing the throttle body to the intake manifold
10) Separate the throttle body from the intake manifold and be careful to retrieve the gasket that goes between them.
11) Hold the throttle body off to the side and remove the intake manifold.
Now you should have a clear view of the radiator hose which is right above the fuel rail. We need to remove it and the thermostat housing to get to the fuel rail.
Cooling system
1) Put a clean rag over the lower intake manifold ports to keep debris from falling in.
2) Make sure the engine is cool and open the radiator cap.
3) Using a turkey baster (thanks for the tip Keith!), remove fluid and put in a clean container for later reuse. Keep removing fluid until you reach the bottom of the housing and fluid no longer drains from the hose.
4) Remove the 2 small hoses attached to the housing.
5) Now loosen the radiator hose clamps on both sides, separate the hose from the thermostat housing (where you took fluid from), rotate the hose up and to the right to keep it out of the way.
6) Use deep sockets to remove the 2 bolts at the base of the thermostat housing. There is a frustrating tab on the front stud that needs to be pushed aside. I used a flat blade screwdriver to remove and pin it out of the way.
7) Remove the housing and put aside in a clean area.
8 ) Cover the hole with a rag.
Fuel Rail removal:
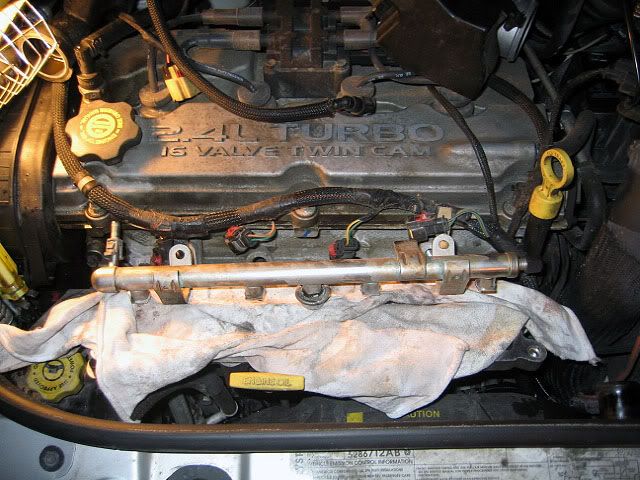
1) Take a shop vac and suck out as much dirt as possible. Clean the area around the injectors as thoroughly as possible.
2) On the extreme left of the fuel rail is the fuel supply hose. Undo the 2 snaps on the connector, wrap a shop towel around the connector and pull off the hose. There will be some slight fuel spray caused by residual pressure in the fuel system. Once the hose is removed plug the fuel rail with a rag to keep fuel from spilling out.
3) Unlock and remove the electrical connectors on the injectors.
4) Remove the 2 bolts that secure the fuel rail to the manifold.
5) Now gently pull on the fuel rail and remove the injectors and fuel rail from the manifold, being careful not to spill fuel from the end of the rail into the cooling system.
6) Take the shop vac and vacuum up any remaining debris.
7) Remove the fuel injector retaining clips and pull out the injectors.
8 ) Clean any intake manifold gasket remains off of the mating surfaces.
Now reverse the process using the new injectors and a new intake manifold gasket when reassembling.
Torque the 5 intake manifold bolts to 28 NM. Start with the middle bolt, then the right one, left one, then the right end bolt, and finish with the left end bolt. Torque the rear manifold support brackets to 28 NM. Torque the throttle body bolts to 12 NM.
PCM Swap:
Before we go any further we need to understand SKIM codes and how they can impede a S1 installation. What the heck is a
SKIM code you ask? SKIM is the acronym for the Sentry Key Immobilizer Module that is present in several components throughout the car. This makes it impossible for a thief to replace a PCM because it's pin number will not match. If you bought your Stage 1 kit used you will need to do one of 2 things to get it to work:
1) Send the PCM back to flight systems so they can flash the PCM to accept a new skim code or,
2) Have a dealer use the DSRB III to tell the car to accept the new PCM. You will not be able to drive before this is done so you will need to do the PCM swap in the dealer’s lot or have the dealer do it for you.
I choose option 2 to avoid delays and cross border shipping. I asked the dealer to look up my pin number and we trotted out to the car where I had just installed the PCM. The tech plugged in the DRBIII and entered the pin number that gave him access to the system. The car verified the pin and allowed the tech to instruct the car to accept the new PCM. I also got the tech to perform the quick learn at the same time at no extra cost.
Generally a P0633 code is set to indicate the PCM change. If done at dealer the tech will typically clear the code but if it was a new or reflashed system the code will be set and disappear later. Ok now it's time to do the easy part, swap the PCM
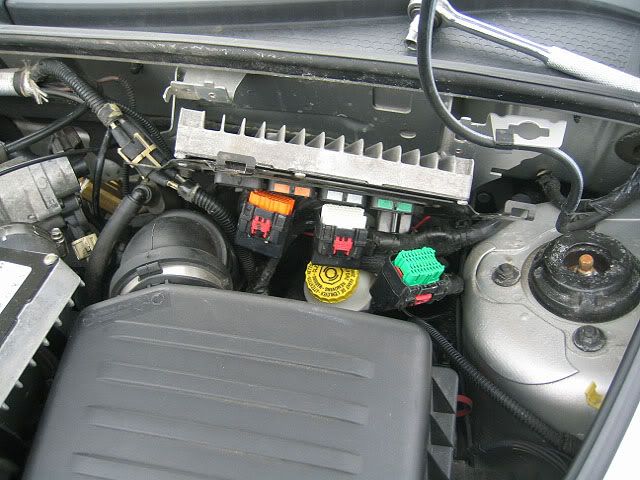
1) Unlock and remove the 4 PCM connectors.
2) Unscrew the 4 screws securing the PCM to the firewall.
3) Remove the PCM assembly from the engine bay and remove the 3 screws securing the PCM to the bracket.
4) Now reverse the process and reassemble using the Stage 1 PCM and reattach the negative battery cable to the battery.
5) Restart the engine and if you have an automatic transmission be sure to go through the tranny learning procedure or have a dealer perform a transmission quick learn. If you have a manual, you are done.
If you have an automatic you MUST do the Quick Learn or you may damage your transmission. The quick learn can be done manually by executing a prescribed series of 25 shifts or the dealer can do it for you in under 10 minutes. The procedure allows the PCM to determine and monitor the transmission Clutch Volume Index (CVI). The CVI represents the volume of fluid needed to compress a clutch pack. By measuring this the transmission will know exactly when to shift.
While many people have done it themselves and swear by it, this operation is critical and I recommend it be done by the dealer so you get the most optimal settings as a base value in your PCM. My reasoning is that the PCM will default to these values when reset whereas a manually learned transmission may default to the less then optimal values initially learned.
Dealer Quick learn Procedure:
(1) Plug the DRBIIIt scan tool into the diagnostic connector. The connector is located under the instrument panel.
(2) Go to the Transmission screen.
(3) Go to the Miscellaneous screen.
(4) Select Quick Learn Procedure. Follow the instructions of the DRBIIIt to perform the Quick Learn Procedure.
Manual learning procedure quoted from the MOPAR instructions:
FAILURE TO PERFORM THE FOLLOWING QUICK LEARN PROCEDURE CAN RESULT IN POOR SHIFT QUALITY AND POSSIBLE TRANSMISSION DAMAGE. YOUR CAR CAN BE DRIVEN PRIOR TO PERFORMING THE FOLLOWING PROCEDURE, HOWEVER, NO WIDE OPEN THROTTLE (WOT) UPSHIFTS SHOULD BE DONE UNTIL THIS PROCEDURE HAS BEEN PERFORMED.
1) Allow the transmission fluid to reach normal operating temperature. To do so, apply the parking brake and let the engine idle in neutral until the engine cooling fan has cycled (turned on and off) one complete time.
2) Perform 15 launches from 0 to 50 mph at 25% to 50% throttle and brake lightly to a complete stop following each launch. This will address the 1-2 and 2-3 upshifts, as well as the 2-1 coastdowns as you brake to a stop.
3) Next, drive at 40 mph and tip into the throttle 50% to 100% until you achieve a 4-3 or 4-2 kickdown. Perform this 10 times.
After these first 25 shifts, the quick learn procedure should be complete. As mentioned above, shift quality will continue to improve following the quick learn procedure. Without these first 25 shifts, however your car could have poor shift quality.
Go easy, and I will catch ya later.
Candyman
A new PCM and injectors to uprgrade performance and power. The bigger injectors are already installed in the 2004 and 2005 engines so they are not included in the kit.
What it does:
The Stage 1 PCM improves power and performance by modifying the operating parameters of the following items:
Calibration Features - Manual Transmission (MTX)
* Increased WOT and part throttle boost
* Enhanced 1st gear boost schedule for a higher performance launch
* Optimized calibration for the Mopar Performance Blow Off Valve Conversion Kit (P4510548 - sold separately)
* Improved turbo resopnse
* Boost hold feature during Wide Open Throttle shifts
* Soft rev limiter
Calibration Features - Automatic Transmission (ATX)
* Increased WOT and part throttle boost
* Optimized calibration for the Mopar Performance Blow Off Valve Conversion Kit (P4510548 - sold separately)
* Improved turbo resopnse
* Performance optimized transmission calibration
What it costs:
$350.00 plus installation
Where to get it:
The Stage 1 PCM kit can be purchase from Tommy Thrift at:
www.haynesspeedshop.com/Store/product.php?productid=4&cat=0&bestseller
Installation:
Installing a Mopar Stage 1 kit on a 2003 is made more complicated by the required injector replacement step which is NOT required for the 2004 and 2005 model year. If you have a 2004 or 2005 PT GT, skip down to the PCM swap section. The 2005 Stage 1 does specify new plugs and wires.
Injector Swap
The first thing you need to do is depressurize the fuel system to avoid spraying fuel everywhere when you disconnect the fuel rail supply hose. As ominous as it sounds it is actually quite easy:
Fuel system depressurization:

1) Locate the Power Distribution Center that is located between the airbox and firewall.
2) Remove the cover, turn it upside down, use the diagram to locate and remove the fuel pump relay.
3) Start the car and wait until it stalls.
4) Try to restart the engine until it will no longer start.
Your engine check light may come on because you pulled the relay. It should go out after several drives. Mine never came on, so it wasn't an issue. Not so bad was it? The last step before continuing is to disconnect the negative battery cable.
Upper intake manifold removal:

1) Unlock and remove the MAP sensor connector from the middle left side of the manifold.
2) Remove the vacuum hose from the left rear of the intake manifold.
3) Remove the brake boost hose from the middle rear of the intake manifold.
4) Remove the 5 bolts securing the intake to the lower half. Work slowly and be carefull when removing the bolts. Once they fall in the engine compartment they enter a wormhole and disappear forever.
5) Remove the 2 rear manifold support bolts. There will be a sensor on the left side so be careful not to forget to put it back on Re-assembly.
6) Loosen the hose clamps on the throttle body intake hose and airbox.
7) Disconnect the hose from the top of the airbox and remove the top half of the air hose.
8 ) Disconnect the hose from the throttle body and push it to the side. I actually inserted it into the airbox hose to keep it out of the way.
9) Remove the 3 bolts securing the throttle body to the intake manifold
10) Separate the throttle body from the intake manifold and be careful to retrieve the gasket that goes between them.
11) Hold the throttle body off to the side and remove the intake manifold.
Now you should have a clear view of the radiator hose which is right above the fuel rail. We need to remove it and the thermostat housing to get to the fuel rail.
Cooling system
1) Put a clean rag over the lower intake manifold ports to keep debris from falling in.
2) Make sure the engine is cool and open the radiator cap.
3) Using a turkey baster (thanks for the tip Keith!), remove fluid and put in a clean container for later reuse. Keep removing fluid until you reach the bottom of the housing and fluid no longer drains from the hose.
4) Remove the 2 small hoses attached to the housing.
5) Now loosen the radiator hose clamps on both sides, separate the hose from the thermostat housing (where you took fluid from), rotate the hose up and to the right to keep it out of the way.
6) Use deep sockets to remove the 2 bolts at the base of the thermostat housing. There is a frustrating tab on the front stud that needs to be pushed aside. I used a flat blade screwdriver to remove and pin it out of the way.
7) Remove the housing and put aside in a clean area.
8 ) Cover the hole with a rag.
Fuel Rail removal:

1) Take a shop vac and suck out as much dirt as possible. Clean the area around the injectors as thoroughly as possible.
2) On the extreme left of the fuel rail is the fuel supply hose. Undo the 2 snaps on the connector, wrap a shop towel around the connector and pull off the hose. There will be some slight fuel spray caused by residual pressure in the fuel system. Once the hose is removed plug the fuel rail with a rag to keep fuel from spilling out.
3) Unlock and remove the electrical connectors on the injectors.
4) Remove the 2 bolts that secure the fuel rail to the manifold.
5) Now gently pull on the fuel rail and remove the injectors and fuel rail from the manifold, being careful not to spill fuel from the end of the rail into the cooling system.
6) Take the shop vac and vacuum up any remaining debris.
7) Remove the fuel injector retaining clips and pull out the injectors.
8 ) Clean any intake manifold gasket remains off of the mating surfaces.
Now reverse the process using the new injectors and a new intake manifold gasket when reassembling.
Torque the 5 intake manifold bolts to 28 NM. Start with the middle bolt, then the right one, left one, then the right end bolt, and finish with the left end bolt. Torque the rear manifold support brackets to 28 NM. Torque the throttle body bolts to 12 NM.
PCM Swap:
Before we go any further we need to understand SKIM codes and how they can impede a S1 installation. What the heck is a
SKIM code you ask? SKIM is the acronym for the Sentry Key Immobilizer Module that is present in several components throughout the car. This makes it impossible for a thief to replace a PCM because it's pin number will not match. If you bought your Stage 1 kit used you will need to do one of 2 things to get it to work:
1) Send the PCM back to flight systems so they can flash the PCM to accept a new skim code or,
2) Have a dealer use the DSRB III to tell the car to accept the new PCM. You will not be able to drive before this is done so you will need to do the PCM swap in the dealer’s lot or have the dealer do it for you.
I choose option 2 to avoid delays and cross border shipping. I asked the dealer to look up my pin number and we trotted out to the car where I had just installed the PCM. The tech plugged in the DRBIII and entered the pin number that gave him access to the system. The car verified the pin and allowed the tech to instruct the car to accept the new PCM. I also got the tech to perform the quick learn at the same time at no extra cost.
Generally a P0633 code is set to indicate the PCM change. If done at dealer the tech will typically clear the code but if it was a new or reflashed system the code will be set and disappear later. Ok now it's time to do the easy part, swap the PCM

1) Unlock and remove the 4 PCM connectors.
2) Unscrew the 4 screws securing the PCM to the firewall.
3) Remove the PCM assembly from the engine bay and remove the 3 screws securing the PCM to the bracket.
4) Now reverse the process and reassemble using the Stage 1 PCM and reattach the negative battery cable to the battery.
5) Restart the engine and if you have an automatic transmission be sure to go through the tranny learning procedure or have a dealer perform a transmission quick learn. If you have a manual, you are done.
If you have an automatic you MUST do the Quick Learn or you may damage your transmission. The quick learn can be done manually by executing a prescribed series of 25 shifts or the dealer can do it for you in under 10 minutes. The procedure allows the PCM to determine and monitor the transmission Clutch Volume Index (CVI). The CVI represents the volume of fluid needed to compress a clutch pack. By measuring this the transmission will know exactly when to shift.
While many people have done it themselves and swear by it, this operation is critical and I recommend it be done by the dealer so you get the most optimal settings as a base value in your PCM. My reasoning is that the PCM will default to these values when reset whereas a manually learned transmission may default to the less then optimal values initially learned.
Dealer Quick learn Procedure:
(1) Plug the DRBIIIt scan tool into the diagnostic connector. The connector is located under the instrument panel.
(2) Go to the Transmission screen.
(3) Go to the Miscellaneous screen.
(4) Select Quick Learn Procedure. Follow the instructions of the DRBIIIt to perform the Quick Learn Procedure.
Manual learning procedure quoted from the MOPAR instructions:
FAILURE TO PERFORM THE FOLLOWING QUICK LEARN PROCEDURE CAN RESULT IN POOR SHIFT QUALITY AND POSSIBLE TRANSMISSION DAMAGE. YOUR CAR CAN BE DRIVEN PRIOR TO PERFORMING THE FOLLOWING PROCEDURE, HOWEVER, NO WIDE OPEN THROTTLE (WOT) UPSHIFTS SHOULD BE DONE UNTIL THIS PROCEDURE HAS BEEN PERFORMED.
1) Allow the transmission fluid to reach normal operating temperature. To do so, apply the parking brake and let the engine idle in neutral until the engine cooling fan has cycled (turned on and off) one complete time.
2) Perform 15 launches from 0 to 50 mph at 25% to 50% throttle and brake lightly to a complete stop following each launch. This will address the 1-2 and 2-3 upshifts, as well as the 2-1 coastdowns as you brake to a stop.
3) Next, drive at 40 mph and tip into the throttle 50% to 100% until you achieve a 4-3 or 4-2 kickdown. Perform this 10 times.
After these first 25 shifts, the quick learn procedure should be complete. As mentioned above, shift quality will continue to improve following the quick learn procedure. Without these first 25 shifts, however your car could have poor shift quality.
Go easy, and I will catch ya later.
Candyman

