Post by Candyman on Jul 15, 2010 16:24:02 GMT -8
Here are my instructions for replacing the dash lamps. It is not nearly as hard as it may seem looking at the instructions. The lamps are #74 instrument lamps, available from almost any parts place. I would recommend buying 4 packs (total of 8) as I say in the instructions. Replace all of them while it is open. You should only need 6, but if you get a bad one, like I did, it will save you a trip back to the store. I would allow a couple of hours to do the job. The second time I did one, it only took 50 min.
1 – Remove negative terminal from the battery, and hit the brake pedal for 30 - 60 seconds to deplete any left over charge left in the system. Any time your working with the Electrical System in your PT, its usually a good idea to remove the battery cable and deplete the System to remove the risk of potentially malfunction and accidentally set off the air bags should something cause a short.
The steps 2 & 3 are to enable you to take out the dashboard cover.
2 – Remove the A Pillar trim from both sides. There are horizontal tabs at the top and vertical ones at the bottom that hold them in place, so they come out only from the top down. I would use my fingernails to pry when ever possible on all of these parts, as a screwdriver can easily scratch things. Get your fingernails inside the A Pillar at the top and pull toward you. It may take a few tugs, but it will pop out. Then lift up and kind of toward you to disengage the lower tabs.
3 – Now you take off the center bezel. Remove the heat/AC, fan etc. knobs. I found them hard to pull off by hand because they are tapered. To resolve this, I used pliers. Put electricians tape on the teeth on both sides so you don’t scratch the knobs. You then need to pry out the power window switch array. This does require a small screwdriver. You can tape it as well to help prevent scratches. Do this carefully, a little at a time, working all the way around it so you don’t break the plastic tabs holding it in. With it out, you need to disconnect the plug on the back. There is a little red sliding lock you will see on one side of it. Take your screwdriver and push it to unlock the connector. With that slid over, you can squeeze the release on the back and pull it out. Remember to re-lock the red tab when you install it later. There is one screw at the top that hold the bezel in. Take it out and pull of the bezel – I was able to do this with just my fingernails. Obviously, you need to keep all the screws with the trim parts they go with.
4 – The dashboard cover. With the center bezel off, there are 2 screws (one right, one left) take those out and now we pry out the dash cover. It has vertical clips in the front and horizontal tabs in the back (closest to the windshield) Start at the right side and pry up on it (once again, just using your fingers if you can) It worked best for me to kind of work the right side and the right side of the middle alternately. Once you have worked your way across to the driver’s side and have the front vertical clips out, just pull it toward you and out it comes. But wait, there is more . . . .
5 – Take apart the plastic housing around the steering wheel – there are 2 screws that you back out from the bottom. There are 3 screws down there, so just remove the 2 that are in the identical locations on either side. The third screw is kind of off by itself. The housing will separate into to halves – top and bottom. You have to push in the emergency flasher switch on the column to get the top one free.
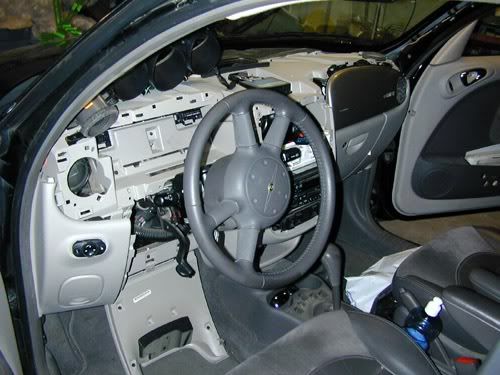
6 – Below the steering column is the knee bolster. Just pull down on it. It is hinged at the top and will swing down. That will reveal 2 screws for the lower left dash cover. Take those 2 out. Now we come to the “be careful” part. I learned this the hard way. You do NOT want to remove this piece completely. This is the remaining piece in the way of removing the instrument bezel. Here is a picture of what things look torn apart.
Note that the lower left cover is only rotated out far enough to remove the bezel
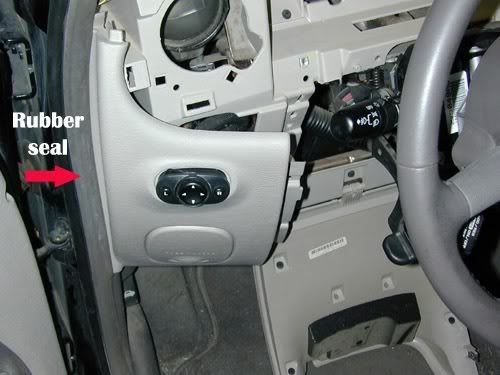
What we are trying to avoid (and I didn’t the first time I did this) is having the cover come out from under the rubber door gasket. If it does, it is a pregnant dog to get back in. I managed to, but made up a whole lot new words doing it. Here is a closer look at it.
You will see that I stared to try put the power window switch (which I removed the first time) but realized it didn’t need to come out.
7 – Now we take out the instrument bezel. It just snaps in with clips. You will want to pry and pull it straight out. This is where you just swing that lower dash cover out enough to get the bezel out, no more. When you get it out (you kind of have to work it over the emergency flasher button) you can just set it up on the dash. You don’t need to unhook any wires. See the first picture – it is sitting on the dash upside down.
8 – Now the reason we took the whole thing apart – the instrument cluster. It has 4 screws and just pops straight out. The connectors are integrated into the back of it.
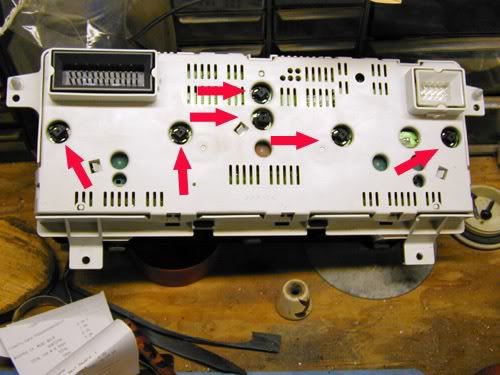
9 – On the back side, you will see 6 twist out lamp holders. Replace them all. The lamps are #74 instrument lamps. You can get them at almost any parts house. I would recommend buying 4 packages, for a total of 8 lamps. I had one burn out after I put the whole thing back together and had to go get more and tear it down again.
These just turn about ¼ turn and lift out. Needle nose pliers work fine. Getting the little lamps out is tricky. I used a large sewing needle and slipped it under the lamp, carefully prying until they popped out. Don’t leave the cluster upside down for more than ½ hour, as I have read it can damage the instruments – I guess some a fluid filled. When all the lamps are replaced, put the cluster back in, making sure it is pushed in well so that the connectors are seated. Now put your negative terminal back on and turn on you headlights to test the bulbs. DON’T forget, like I did, to test your high beam indicator lamp as well. I didn’t. The first time my wife drove the car at night and hit the high beams, the bulb burnt out – hence doing it twice.
Putting it back together is easy – however I found that the instrument bezel clips have a way of falling off as you try to re-install it. Watch out for that and if they fall watch where they go. Remember to unhook the negative battery terminal prior to re-assembling.
A word of CAUTION. If you remove the instrument cluster never turn it upside down for more than thirty minutes. The needles are viscus damped (fluid damped). Turning the cluster upside down disturbed the fluid. If possible, never turn the cluster upside down.
Here are a couple of Photo's showing what the Dash looks like when its apart, as well as what the Gauge Pod looks like from behind, and where the Bulbs are located.


You all go easy, I hope this might help you out should you ever need to perform this task, but if you ever need anything else, please let me know and I would be more than happy to try to help out wherever I can anytime.
Catch ya later.
Candyman
1 – Remove negative terminal from the battery, and hit the brake pedal for 30 - 60 seconds to deplete any left over charge left in the system. Any time your working with the Electrical System in your PT, its usually a good idea to remove the battery cable and deplete the System to remove the risk of potentially malfunction and accidentally set off the air bags should something cause a short.
The steps 2 & 3 are to enable you to take out the dashboard cover.
2 – Remove the A Pillar trim from both sides. There are horizontal tabs at the top and vertical ones at the bottom that hold them in place, so they come out only from the top down. I would use my fingernails to pry when ever possible on all of these parts, as a screwdriver can easily scratch things. Get your fingernails inside the A Pillar at the top and pull toward you. It may take a few tugs, but it will pop out. Then lift up and kind of toward you to disengage the lower tabs.
3 – Now you take off the center bezel. Remove the heat/AC, fan etc. knobs. I found them hard to pull off by hand because they are tapered. To resolve this, I used pliers. Put electricians tape on the teeth on both sides so you don’t scratch the knobs. You then need to pry out the power window switch array. This does require a small screwdriver. You can tape it as well to help prevent scratches. Do this carefully, a little at a time, working all the way around it so you don’t break the plastic tabs holding it in. With it out, you need to disconnect the plug on the back. There is a little red sliding lock you will see on one side of it. Take your screwdriver and push it to unlock the connector. With that slid over, you can squeeze the release on the back and pull it out. Remember to re-lock the red tab when you install it later. There is one screw at the top that hold the bezel in. Take it out and pull of the bezel – I was able to do this with just my fingernails. Obviously, you need to keep all the screws with the trim parts they go with.
4 – The dashboard cover. With the center bezel off, there are 2 screws (one right, one left) take those out and now we pry out the dash cover. It has vertical clips in the front and horizontal tabs in the back (closest to the windshield) Start at the right side and pry up on it (once again, just using your fingers if you can) It worked best for me to kind of work the right side and the right side of the middle alternately. Once you have worked your way across to the driver’s side and have the front vertical clips out, just pull it toward you and out it comes. But wait, there is more . . . .
5 – Take apart the plastic housing around the steering wheel – there are 2 screws that you back out from the bottom. There are 3 screws down there, so just remove the 2 that are in the identical locations on either side. The third screw is kind of off by itself. The housing will separate into to halves – top and bottom. You have to push in the emergency flasher switch on the column to get the top one free.
6 – Below the steering column is the knee bolster. Just pull down on it. It is hinged at the top and will swing down. That will reveal 2 screws for the lower left dash cover. Take those 2 out. Now we come to the “be careful” part. I learned this the hard way. You do NOT want to remove this piece completely. This is the remaining piece in the way of removing the instrument bezel. Here is a picture of what things look torn apart.
Note that the lower left cover is only rotated out far enough to remove the bezel
What we are trying to avoid (and I didn’t the first time I did this) is having the cover come out from under the rubber door gasket. If it does, it is a pregnant dog to get back in. I managed to, but made up a whole lot new words doing it. Here is a closer look at it.
You will see that I stared to try put the power window switch (which I removed the first time) but realized it didn’t need to come out.
7 – Now we take out the instrument bezel. It just snaps in with clips. You will want to pry and pull it straight out. This is where you just swing that lower dash cover out enough to get the bezel out, no more. When you get it out (you kind of have to work it over the emergency flasher button) you can just set it up on the dash. You don’t need to unhook any wires. See the first picture – it is sitting on the dash upside down.
8 – Now the reason we took the whole thing apart – the instrument cluster. It has 4 screws and just pops straight out. The connectors are integrated into the back of it.
9 – On the back side, you will see 6 twist out lamp holders. Replace them all. The lamps are #74 instrument lamps. You can get them at almost any parts house. I would recommend buying 4 packages, for a total of 8 lamps. I had one burn out after I put the whole thing back together and had to go get more and tear it down again.
These just turn about ¼ turn and lift out. Needle nose pliers work fine. Getting the little lamps out is tricky. I used a large sewing needle and slipped it under the lamp, carefully prying until they popped out. Don’t leave the cluster upside down for more than ½ hour, as I have read it can damage the instruments – I guess some a fluid filled. When all the lamps are replaced, put the cluster back in, making sure it is pushed in well so that the connectors are seated. Now put your negative terminal back on and turn on you headlights to test the bulbs. DON’T forget, like I did, to test your high beam indicator lamp as well. I didn’t. The first time my wife drove the car at night and hit the high beams, the bulb burnt out – hence doing it twice.
Putting it back together is easy – however I found that the instrument bezel clips have a way of falling off as you try to re-install it. Watch out for that and if they fall watch where they go. Remember to unhook the negative battery terminal prior to re-assembling.
A word of CAUTION. If you remove the instrument cluster never turn it upside down for more than thirty minutes. The needles are viscus damped (fluid damped). Turning the cluster upside down disturbed the fluid. If possible, never turn the cluster upside down.
Here are a couple of Photo's showing what the Dash looks like when its apart, as well as what the Gauge Pod looks like from behind, and where the Bulbs are located.


You all go easy, I hope this might help you out should you ever need to perform this task, but if you ever need anything else, please let me know and I would be more than happy to try to help out wherever I can anytime.
Catch ya later.
Candyman

